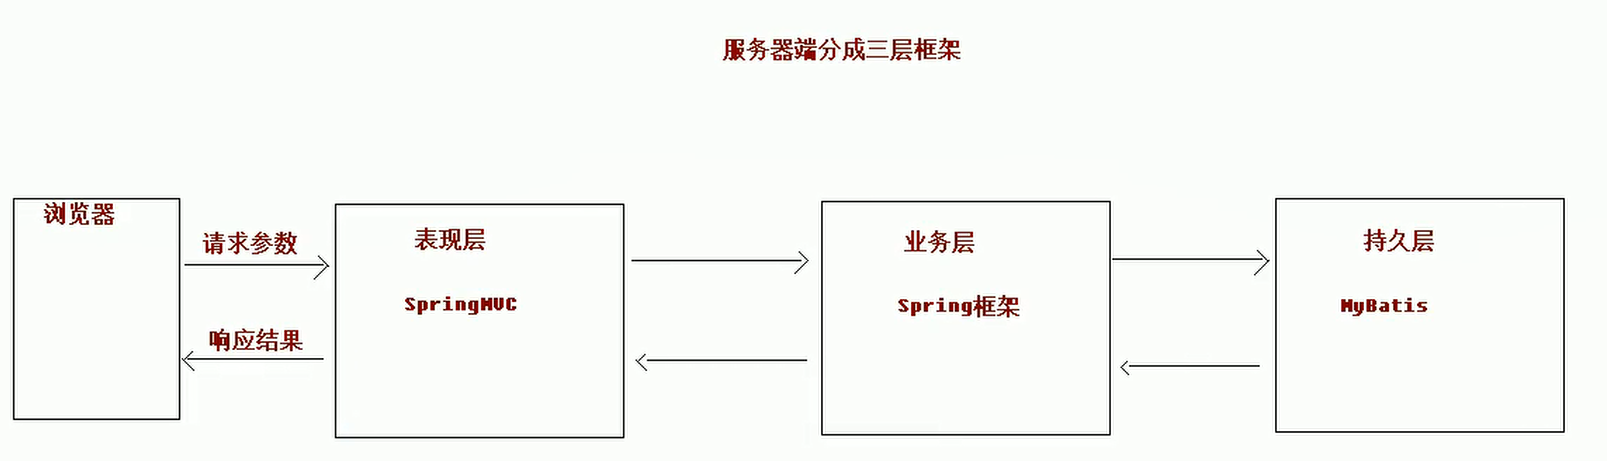
基本概念
三层架构
- 咱们开发服务器端程序,一般都基于两种形式,一种
C/S架构程序,一种B/S架构程序 - 使用
Java语言基本上都是开发B/S架构的程序,B/S架构又分成了三层架构 - 三层架构
- 表现层:
WEB层,用来和客户端进行数据交互的。表现层一般会采用MVC的设计模型 - 业务层:处理公司具体的业务逻辑的
- 持久层:用来操作数据库的
- 表现层:
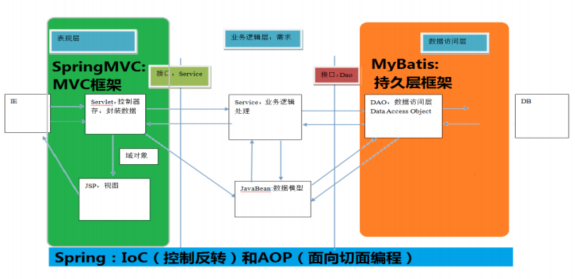
MVC模型
MVC全名是Model View Controller模型视图控制器,每个部分各司其职。Model:数据模型,JavaBean的类,用来进行数据封装。View:指JSP、HTML用来展示数据给用户- Controller:用来接收用户的请求,整个流程的控制器。用来进行数据校验等。
SpringMVC的概述
SpringMVC的概述- 是一种基于
Java实现的MVC设计模型的请求驱动类型的轻量级WEB框架。 Spring MVC属于SpringFrameWork的后续产品,已经融合在Spring Web Flow里面。Spring框架提供了构建Web应用程序的全功能MVC模块。- 使用
Spring可插入的MVC架构,从而在使用Spring进行WEB开发时,可以选择使用Spring的SpringMVC框架或集成其他MVC开发框架,如Struts1(现在一般不用),Struts2等。
- 是一种基于
SpringMVC在三层架构中的位置- 表现层框架
SpringMVC的优势
1、清晰的角色划分:
前端控制器(
DispatcherServlet)请求到处理器映射(
HandlerMapping)处理器适配器(
HandlerAdapter)视图解析器(
ViewResolver)处理器或页面控制器(
Controller)验证器(
Validator)命令对象(
Command请求参数绑定到的对象就叫命令对象)表单对象(
Form Object提供给表单展示和提交到的对象就叫表单对象)。2、分工明确,而且扩展点相当灵活,可以很容易扩展,虽然几乎不需要。
3、由于命令对象就是一个
POJO,无需继承框架特定API,可以使用命令对象直接作为业务对象。4、和 Spring 其他框架无缝集成,是其它 Web 框架所不具备的。
5、可适配,通过
HandlerAdapter可以支持任意的类作为处理器。6、可定制性,
HandlerMapping、ViewResolver等能够非常简单的定制。7、功能强大的数据验证、格式化、绑定机制。
8、利用
Spring提供的Mock对象能够非常简单的进行 Web 层单元测试。9、本地化、主题的解析的支持,使我们更容易进行国际化和主题的切换。
10、强大的
JSP标签库,使JSP编写更容易。………………还有比如RESTful风格的支持、简单的文件上传、约定大于配置的契约式编程支持、基于注解的零配
置支持等等。
SpringMVC和Struts2框架的对比
共同点:
- 它们都是表现层框架,都是基于 MVC 模型编写的。
- 它们的底层都离不开原始
ServletAPI。- 它们处理请求的机制都是一个核心控制器。
区别:
Spring MVC的入口是Servlet, 而Struts2是FilterSpring MVC是基于方法设计的,而Struts2是基于类,Struts2每次执行都会创建一个动作类。所- 以
Spring MVC会稍微比Struts2快些。Spring MVC使用更加简洁,同时还支持JSR303, 处理ajax的请求更方便Struts2的OGNL表达式使页面的开发效率相比Spring MVC更高些,但执行效率并没有比JSTL提升,尤其是
struts2的表单标签,远没有html执行效率高。
JSR303是一套JavaBean参数校验的标准,它定义了很多常用的校验注解- 我们可以直接将这些注解加在我们
JavaBean的属性上面,就可以在需要校验的时候进行校验了。
入门
入门案例
- 入门案例的需求
- 搭建开发环境
- 编写入门程序
搭建开发环境
创建项目
- 使用骨架
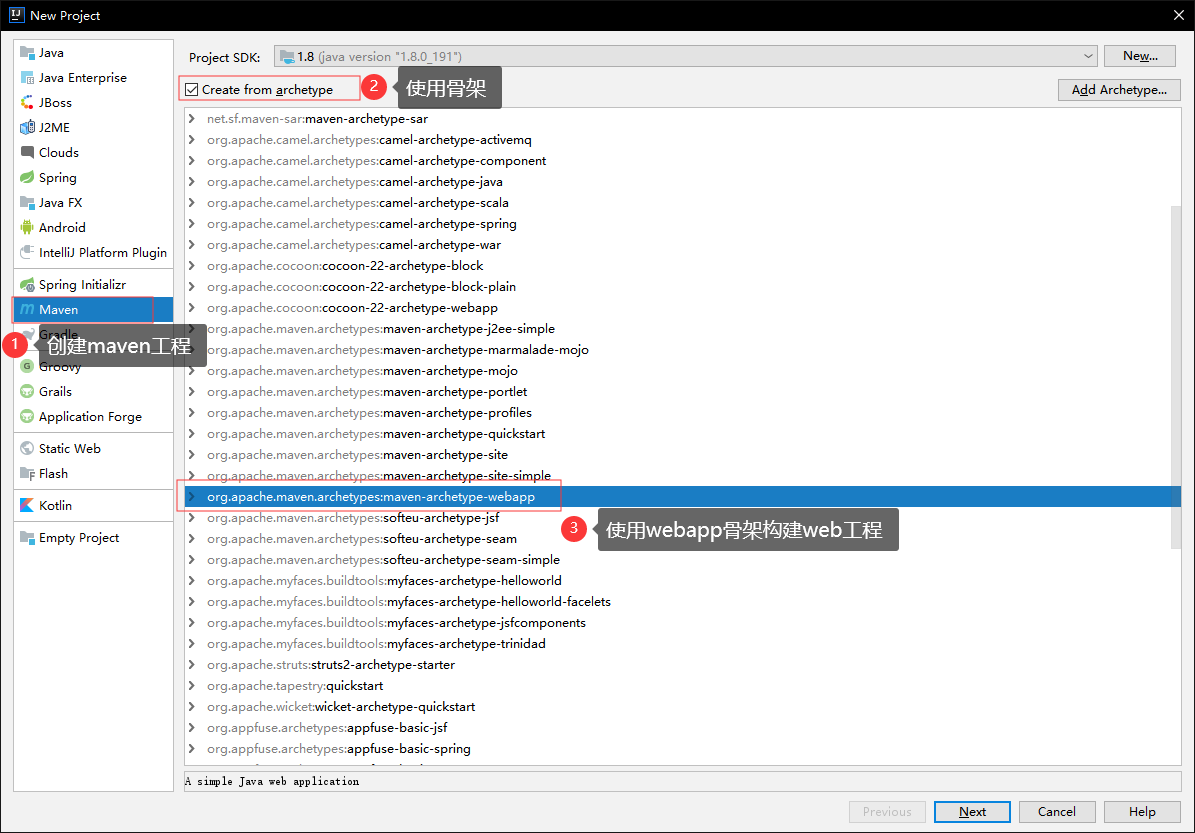
- 起名
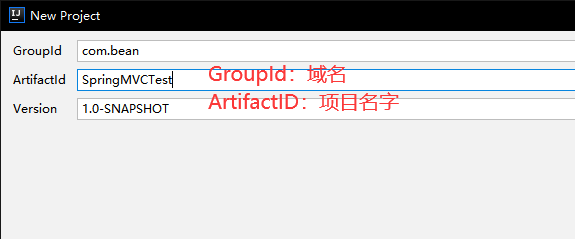
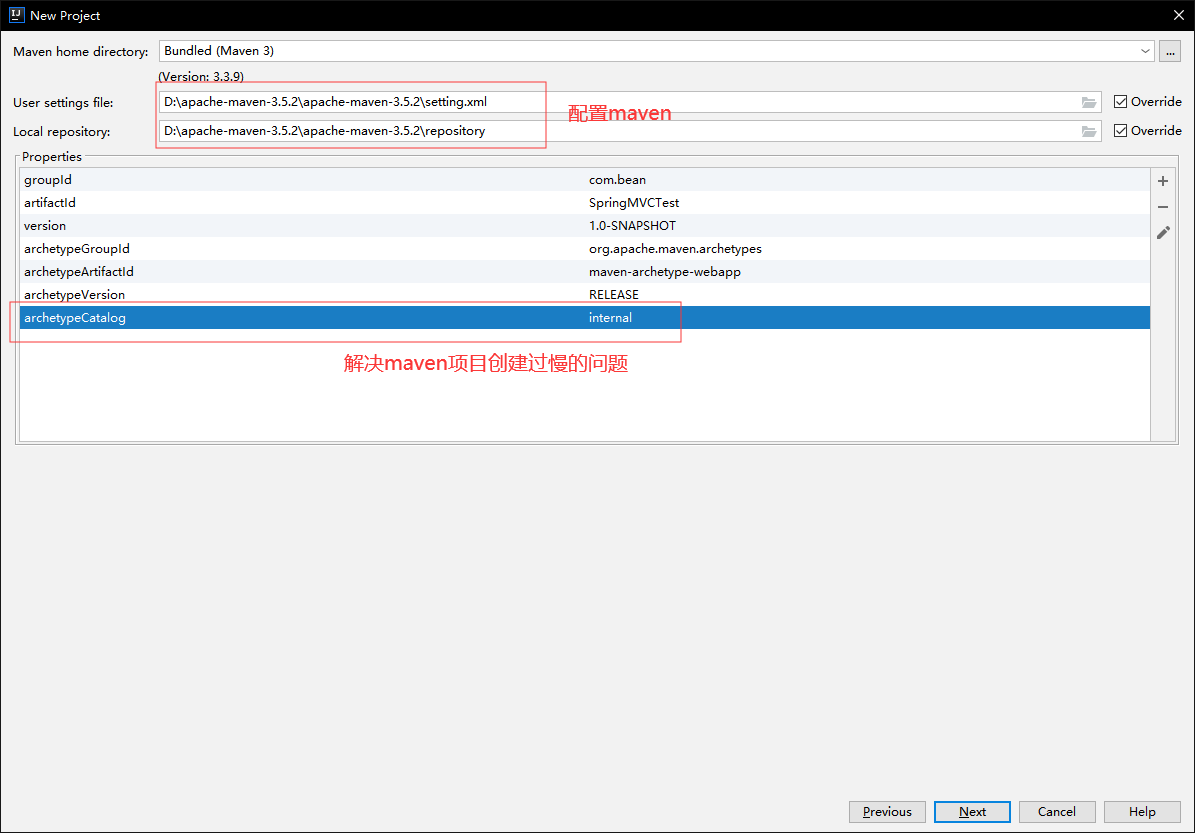
- 配置
maven,解决maven项目配置过慢的问题
archetypeCatalog
internal
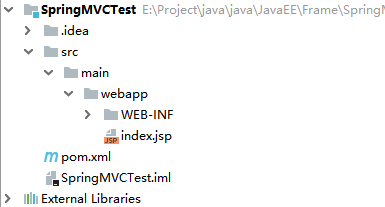
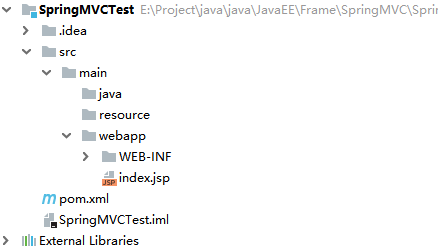
补全maven的目录结构
- 之前是这样的:
- 补全之后是这样的:
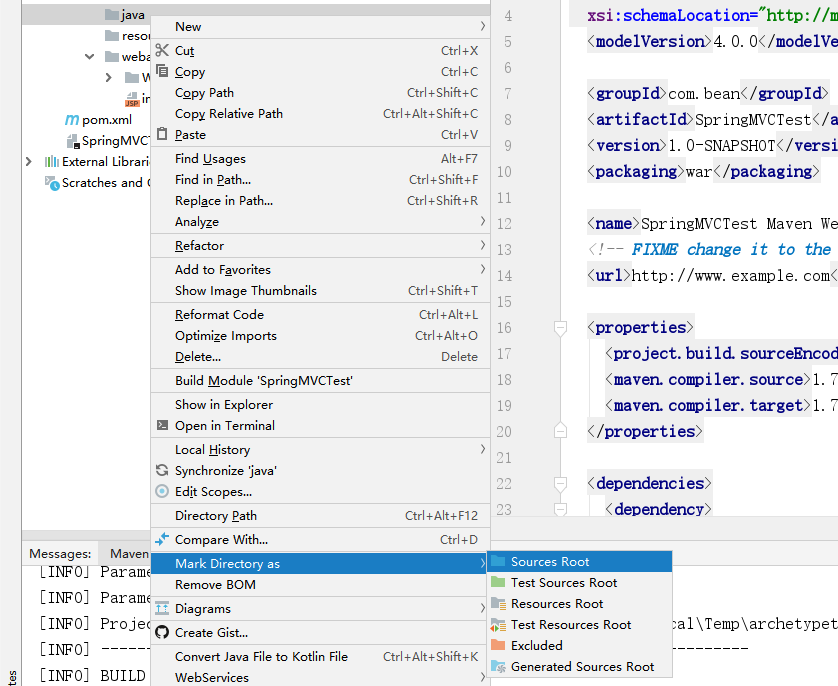
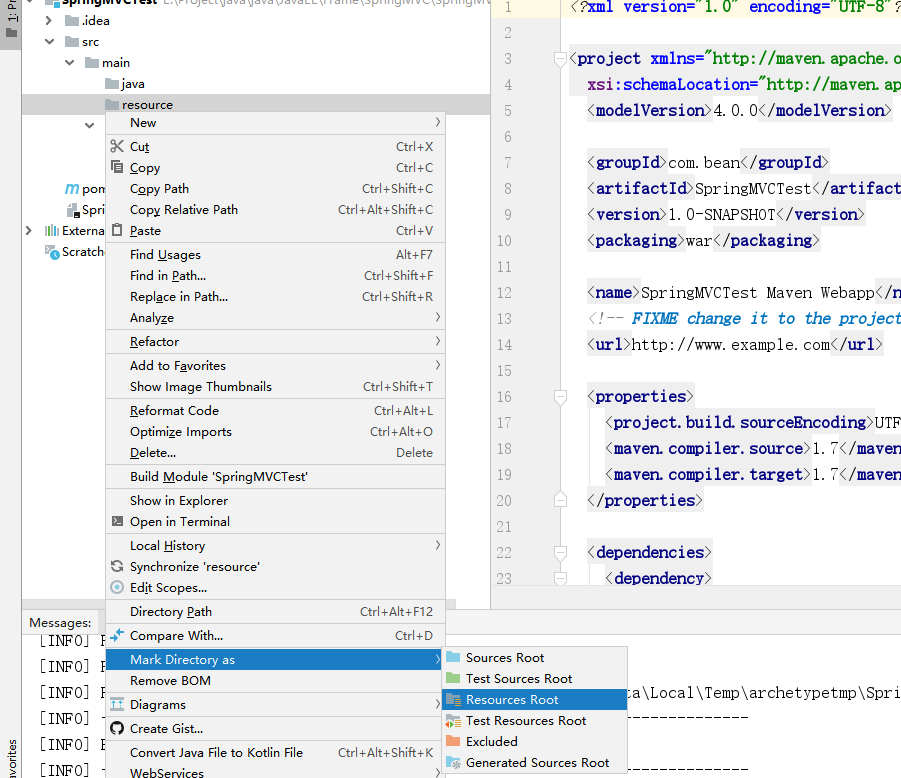
- 将
java配置为源码文件夹
- 将
resource配置为资源文件夹
导入jar包,导入依赖
<!-- 版本锁定 -->
<properties>
    <spring.version>5.0.2.RELEASE</spring.version>
</properties>

<dependencies>
    <dependency>
        <groupId>org.springframework</groupId>
        <artifactId>spring-context</artifactId>
        <version>${spring.version}</version>
    </dependency>

    <dependency>
        <groupId>org.springframework</groupId>
        <artifactId>spring-web</artifactId>
        <version>${spring.version}</version>
    </dependency>

    <dependency>
        <groupId>org.springframework</groupId>
        <artifactId>spring-webmvc</artifactId>
        <version>${spring.version}</version>
    </dependency>

    <dependency>
        <groupId>javax.servlet</groupId>
        <artifactId>servlet-api</artifactId>
        <version>2.5</version>
        <scope>provided</scope>
    </dependency>

    <dependency>
        <groupId>javax.servlet.jsp</groupId>
        <artifactId>jsp-api</artifactId>
        <version>2.0</version>
        <scope>provided</scope>
    </dependency>
</dependencies>
在web.xml中配置前端控制器
<!DOCTYPE web-app PUBLIC
 "-//Sun Microsystems, Inc.//DTD Web Application 2.3//EN"
 "http://java.sun.com/dtd/web-app_2_3.dtd" >

<web-app>
  <display-name>Archetype Created Web Application</display-name>


  <!--配置前端控制器
    org.springframework.web.servlet.DispatcherServlet:前端控制器,这个类是固定的
    url-pattern:值为"/",说明任何的类都会拦截
  -->
  <servlet>
    <servlet-name>dispatcherServlet</servlet-name>
    <servlet-class>org.springframework.web.servlet.DispatcherServlet</servlet-class>
  </servlet>
  <servlet-mapping>
    <servlet-name>dispatcherServlet</servlet-name>
    <url-pattern>/</url-pattern>
  </servlet-mapping>
</web-app>
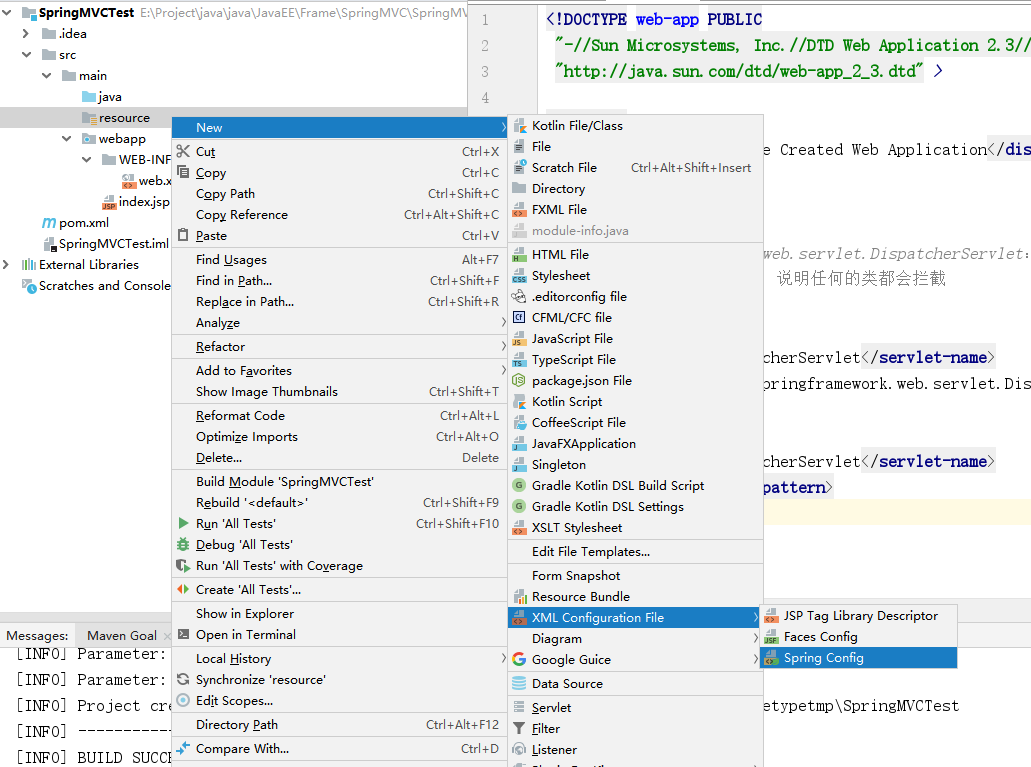
在resource下创建配置文件springmvc.xml
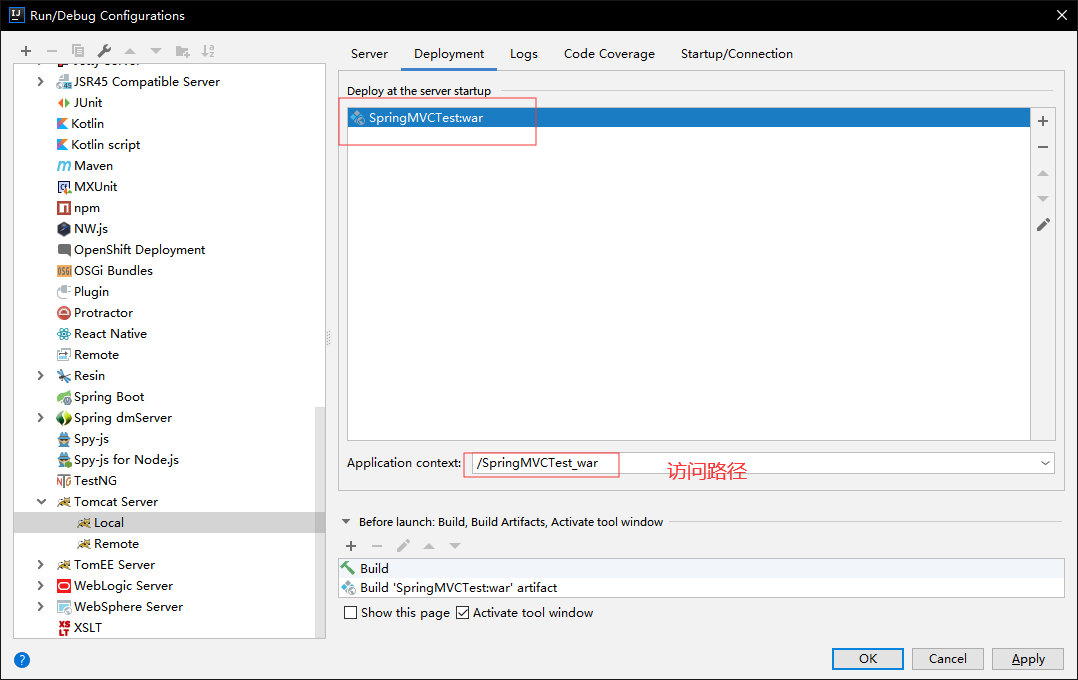
配置服务器

编写入门程序
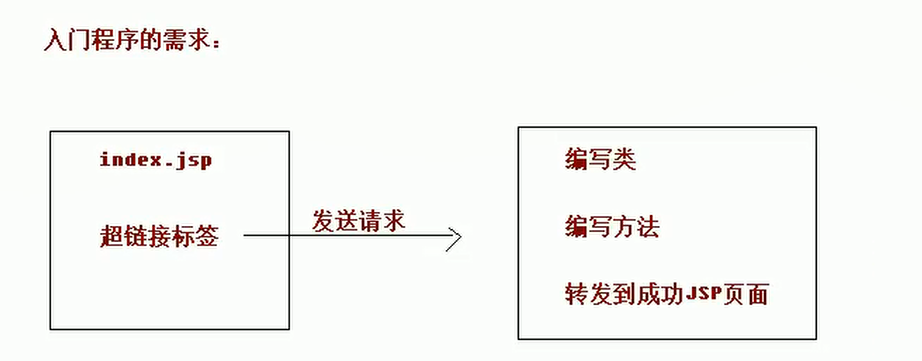
需求
- 开发环境搭建完成之后,确认一件事:我们的需求
我们需要一个index.jsp页面,使用超链接发送请求,通过前端控制器找到类中的方法,获得返回的页面,然后跳转到该页面
过程
- 编写开始界面
index.jsp - 编写
web.xml配置 - 编写
springmvc.xml配置 - 编写控制器类
HelloController与方法sayHello() - 编写跳转界面
success.jsp
编写
- 编写开始界面
jsp
<%@ page contentType="text/html;charset=UTF-8" language="java" %>
<html>
<head>
    <title>Title</title>
</head>
<body>
    <h3>SpringMVC入门程序</h3>

    <%--注意,这里配置的路径是hello,意思是点击这个超链接之后,跳转到"/hello"的路径--%>
    <a href="hello">入门程序</a>
</body>
</html>
- 编写
web.xml核心控制器
<!DOCTYPE web-app PUBLIC
        "-//Sun Microsystems, Inc.//DTD Web Application 2.3//EN"
        "http://java.sun.com/dtd/web-app_2_3.dtd" >

<web-app>
  <display-name>Archetype Created Web Application</display-name>


  <!--配置前端控制器 org.springframework.web.servlet.DispatcherServlet:前端控制器,这个类是固定的-->
  <servlet>
    <servlet-name>dispatcherServlet</servlet-name>
    <servlet-class>org.springframework.web.servlet.DispatcherServlet</servlet-class>

    <!--配置读取springmvc.xml这个配置文件-->
    <init-param>
      <param-name>contextConfigLocation</param-name>
      <param-value>classpath:springmvc.xml</param-value>
    </init-param>

    <!-- 一般来说DispatcherServlet是在请求的时候才创建的,但是这里配置的是服务器启动的时候就要创建 -->
    <load-on-startup>1</load-on-startup>
  </servlet>

  <!--url-pattern:值为"/",说明任何的类都会拦截-->
  <servlet-mapping>
    <servlet-name>dispatcherServlet</servlet-name>
    <url-pattern>/</url-pattern>
  </servlet-mapping>

</web-app>
- 编写
springmvc.xml
<?xml version="1.0" encoding="UTF-8"?>
<beans xmlns="http://www.springframework.org/schema/beans"
       xmlns:mvc="http://www.springframework.org/schema/mvc"
       xmlns:context="http://www.springframework.org/schema/context"
       xmlns:xsi="http://www.w3.org/2001/XMLSchema-instance"
       xsi:schemaLocation="
       http://www.springframework.org/schema/beans
       http://www.springframework.org/schema/beans/spring-beans.xsd
       http://www.springframework.org/schema/mvc
       http://www.springframework.org/schema/mvc/spring-mvc.xsd
       http://www.springframework.org/schema/context
       http://www.springframework.org/schema/context/spring-context.xsd">

    <!--这里开启注解扫描-->
    <context:component-scan base-package="com.bean"></context:component-scan>

    <!--配置视图解析器,只要有人告诉视图解析器我要找什么界面,就去找
        prefix:配置界面的路径,去这个路径下找界面
        suffix:配置后缀名,注意"."
    -->
    <bean id="internalResourceViewResolver" class="org.springframework.web.servlet.view.InternalResourceViewResolver">
        <property name="prefix" value="/WEB-INF/pages"></property>
        <property name="suffix" value=".jsp"></property>
    </bean>

    <!--开启SpringMVC框架注解的支持-->
    <mvc:annotation-driven/>
</beans>
- 配置控制器
HelloController和方法
package com.bean.controller;


import org.springframework.stereotype.Controller;
import org.springframework.web.bind.annotation.RequestMapping;

//这里是控制器类,@Controller指的是配置的控制器类
@Controller
public class HelloController {
    /*
    * 这里配置的是请求映射
    * 这个方法的映射就是路径"/hello",也就是index.jsp超链接的访问路径
    * @RequestMapping属于SpringMVC注解
    * */
    @RequestMapping(path = "/hello")
    String sayHello(){
        System.out.println("Hello SpringMVC");
        return "/success";//返回值方法不是随便返回的,这个返回值说明告诉视图解析器,我要找success这个界面,注意斜杠
    }
}
- 配置最后的界面
<%@ page contentType="text/html;charset=UTF-8" language="java" %>
<html>
<head>
<title>Title</title>
</head>
<body>
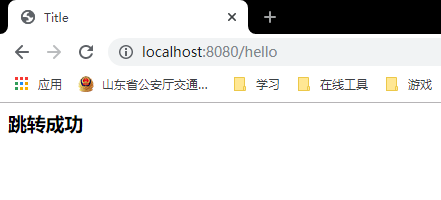
<h3>跳转成功</h3>
</body>
</html>
测试
流程总结
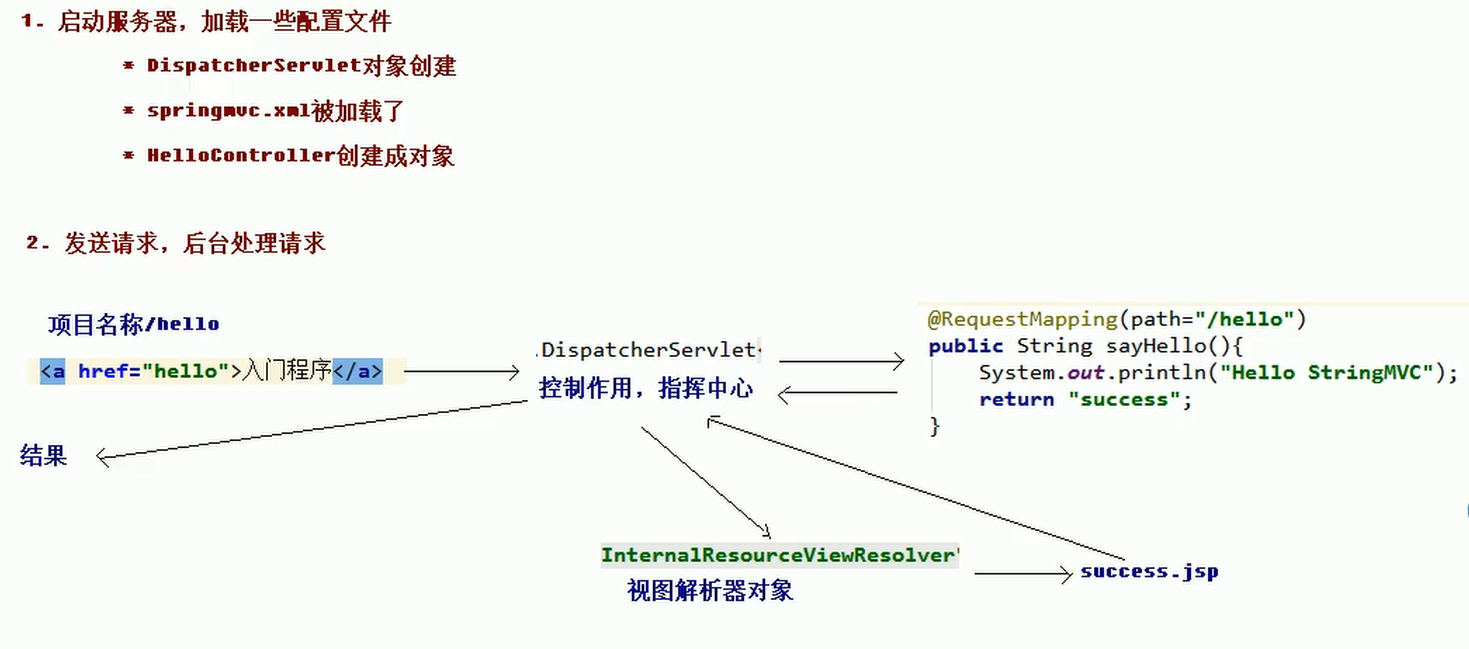
- 启动服务器,加载配置文件
- 访问
web.xml- 因为配置,所以在启动服务器的时候创建前端控制器
DispactherServlet - 读取配置文件
springmvc.xml
- 因为配置,所以在启动服务器的时候创建前端控制器
- 访问
springmvc.xml- 开启注解扫描
- 配置了视图解析器
- 开启了
SpringMVC框架注解的支持
- 访问
- 发送请求,后台处理请求
- 在
index.jsp的超链接中访问/hello路径 - 请求被
web.xml中的servlet配置拦截,然后交由前端控制器DispactherServlet - 根据访问路径调用方法
sayHello(),返回了success - 返回的
success交给了前端控制器 - 前端控制器交给
springvc.xml中的视图解析器InternalResourceViewResolver - 在视图解析器发现路径和后缀名称,发现文件
- 视图解析器再交给前端控制器,由前端控制器返回结果
- 在
在上面,我们发现前端控制器可以说是起到了一个总控的作用
更加详细的流程
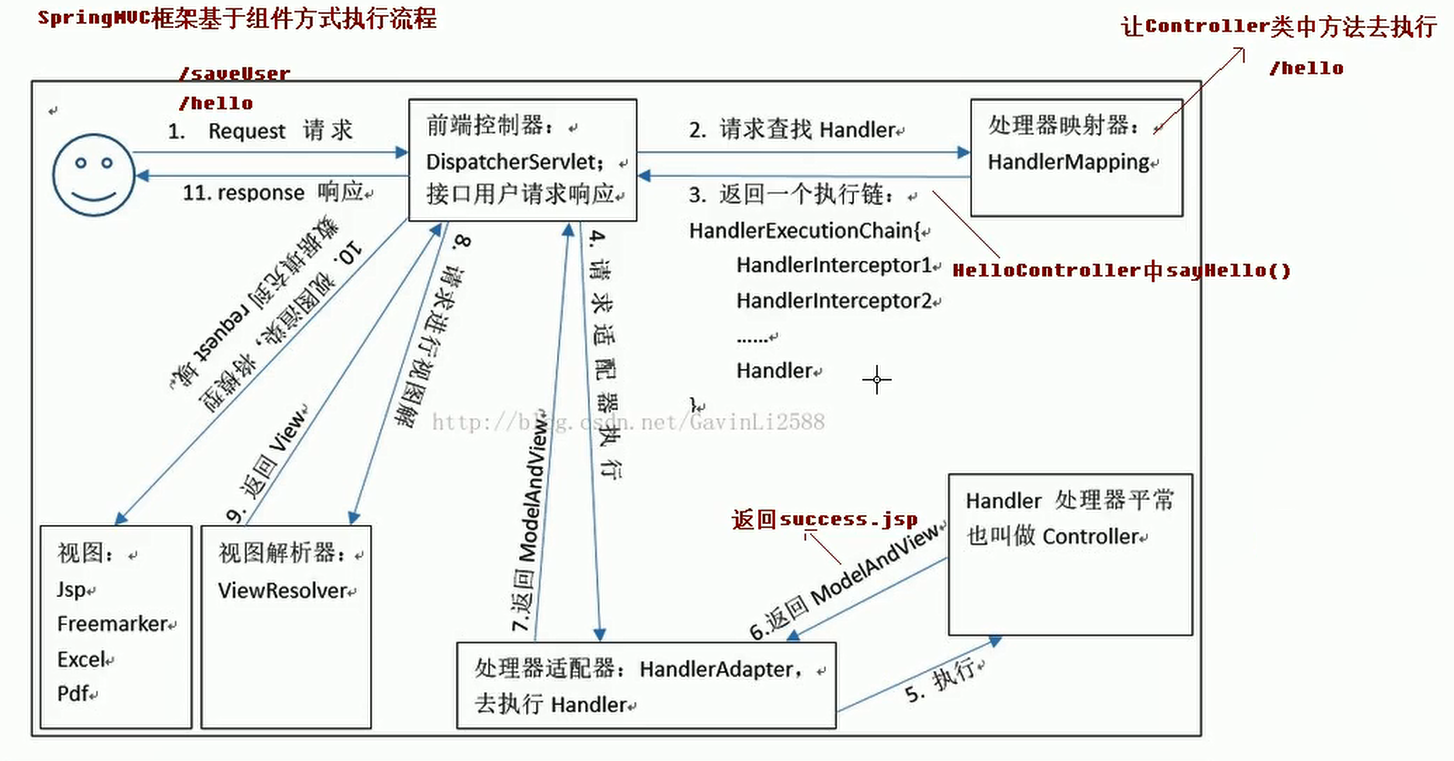
<mvc:annotation-driven>
处理器映射器,处理器适配器,视图解析器被称为
SpringMVC的三大组件
- 处理器映射器
- 处理器适配器
- 视图解析器
HandlerMapping负责根据用户请求找到Handler即处理器,SpringMVC提供了不同的映射器实现不同的映射方式,例如:配置文件方式,实现接口方式,注解方式等。
通过
HandlerAdapter对处理器进行执行,这是适配器模式的应用,通过扩展适配器可以对更多类型的处理器进行执行。
View Resolver负责将处理结果生成View视图,View Resolver首先根据逻辑视图名解析成物理视图名即具体的页面地址,再生成
View视图对象,最后对View进行渲染将处理结果通过页面展示给用户。
我们在之前配置
springmvc.xml的时候配置了这个这个不仅有支持
SpringMVC注解的作用,也有让其自动配置
- 处理器映射器
- 处理器适配器
的作用
RequestMapping注解
- 作用:建立请求
URL与请求方法之间的关系 - 出现位置
- 类上:声明一级目录
- 方法上:声明二级目录,假如类上没有目录就是一级目录
- 属性
path:路径value:别名是pathmethod:指定该方法的请求方式RequestMethod.GETRequestMethod.POSTRequestMethod.PUTRequestMethod.HEADRequestMethod.DELETERequestMethod.PATCHRequestMethod.OPTIONSRequestMethod.TRACE
params:指定限制请求参数的条件,比如必须要有usernmae才可以访问,甚至限制username=hehe等才可以访问headers:请求参数的请求头必须包含所指定的
例子
- 配置目录
<%@ page contentType="text/html;charset=UTF-8" language="java" %>
<html>
<head>
    <title>Title</title>
</head>
<body>
    <h3>SpringMVC入门程序</h3>

    <%--注意,这里配置的路径是hello,意思是点击这个超链接之后,跳转到"/hello"的路径--%>
    <a href="test/hello">入门程序</a>
</body>
</html>
package com.bean.controller;

import org.springframework.stereotype.Controller;
import org.springframework.web.bind.annotation.RequestMapping;

@Controller
@RequestMapping(path = "/test") //一级目录
public class HelloController {
    @RequestMapping(path = "/hello")    //二级目录,访问时就是:http://localhost:8080/test/hello
    String sayHello(){
        System.out.println("Hello SpringMVC");
        return "/success";
    }

    @RequestMapping(path = "/mapping")//二级目录,访问时就是:http://localhost:8080/test/mapping
    String testMapping(){
        System.out.println("testMapping...");
        return "/success";
    }
}
- 配置请求方式
<%@ page contentType="text/html;charset=UTF-8" language="java" %>
<html>
<head>
    <title>Title</title>
</head>
<body>
    <h3>SpringMVC入门程序</h3>

    <%--注意,这里配置的路径是hello,意思是点击这个超链接之后,跳转到"/hello"的路径--%>
    <a href="test/hello">入门程序</a>
</body>
</html>
package com.bean.controller;


import org.springframework.stereotype.Controller;
import org.springframework.web.bind.annotation.RequestMapping;
import org.springframework.web.bind.annotation.RequestMethod;

@Controller
public class HelloController {
    @RequestMapping(path = "/hello",method = RequestMethod.GET)//配置访问方式必须为GET
    String sayHello(){
        System.out.println("Hello SpringMVC");
        return "/success";
    }
}
- 配置请求参数
<%@ page contentType="text/html;charset=UTF-8" language="java" %>
<html>
<head>
    <title>Title</title>
</head>
<body>
    <h3>SpringMVC入门程序</h3>

    <%--注意,这里配置的路径是hello,意思是点击这个超链接之后,跳转到"/hello"的路径--%>
    <a href="test/requestMapping">入门程序</a>

    <a href="test/requestMapping?username=haha">测试是否有所规定的username</a>

    <%-- 不是hehe,凉了 --%>
    <a href="test/requestMappingTest?username=heihei">测试是否有所规定的username,且username是否为hehe</a>


</body>
</html>
package com.bean.controller;


import org.springframework.stereotype.Controller;
import org.springframework.web.bind.annotation.RequestMapping;
import org.springframework.web.bind.annotation.RequestMethod;

@Controller
@RequestMapping(path = "/test")
public class HelloController {
    @RequestMapping(path = "/hello")
    String sayHello(){
        System.out.println("Hello SpringMVC");
        return "/success";
    }

    @RequestMapping(path = "/requestMapping",params = "username")//配置请求参数中必须有username
    String requestMapping(){
        return "/success";
    }

    @RequestMapping(path = "/requestMappingTest",params = "username=hehe")//配置请求参数中必须有username,且username必须为hehe
    String requestMappingTest(){
        return "/success";
    }
}
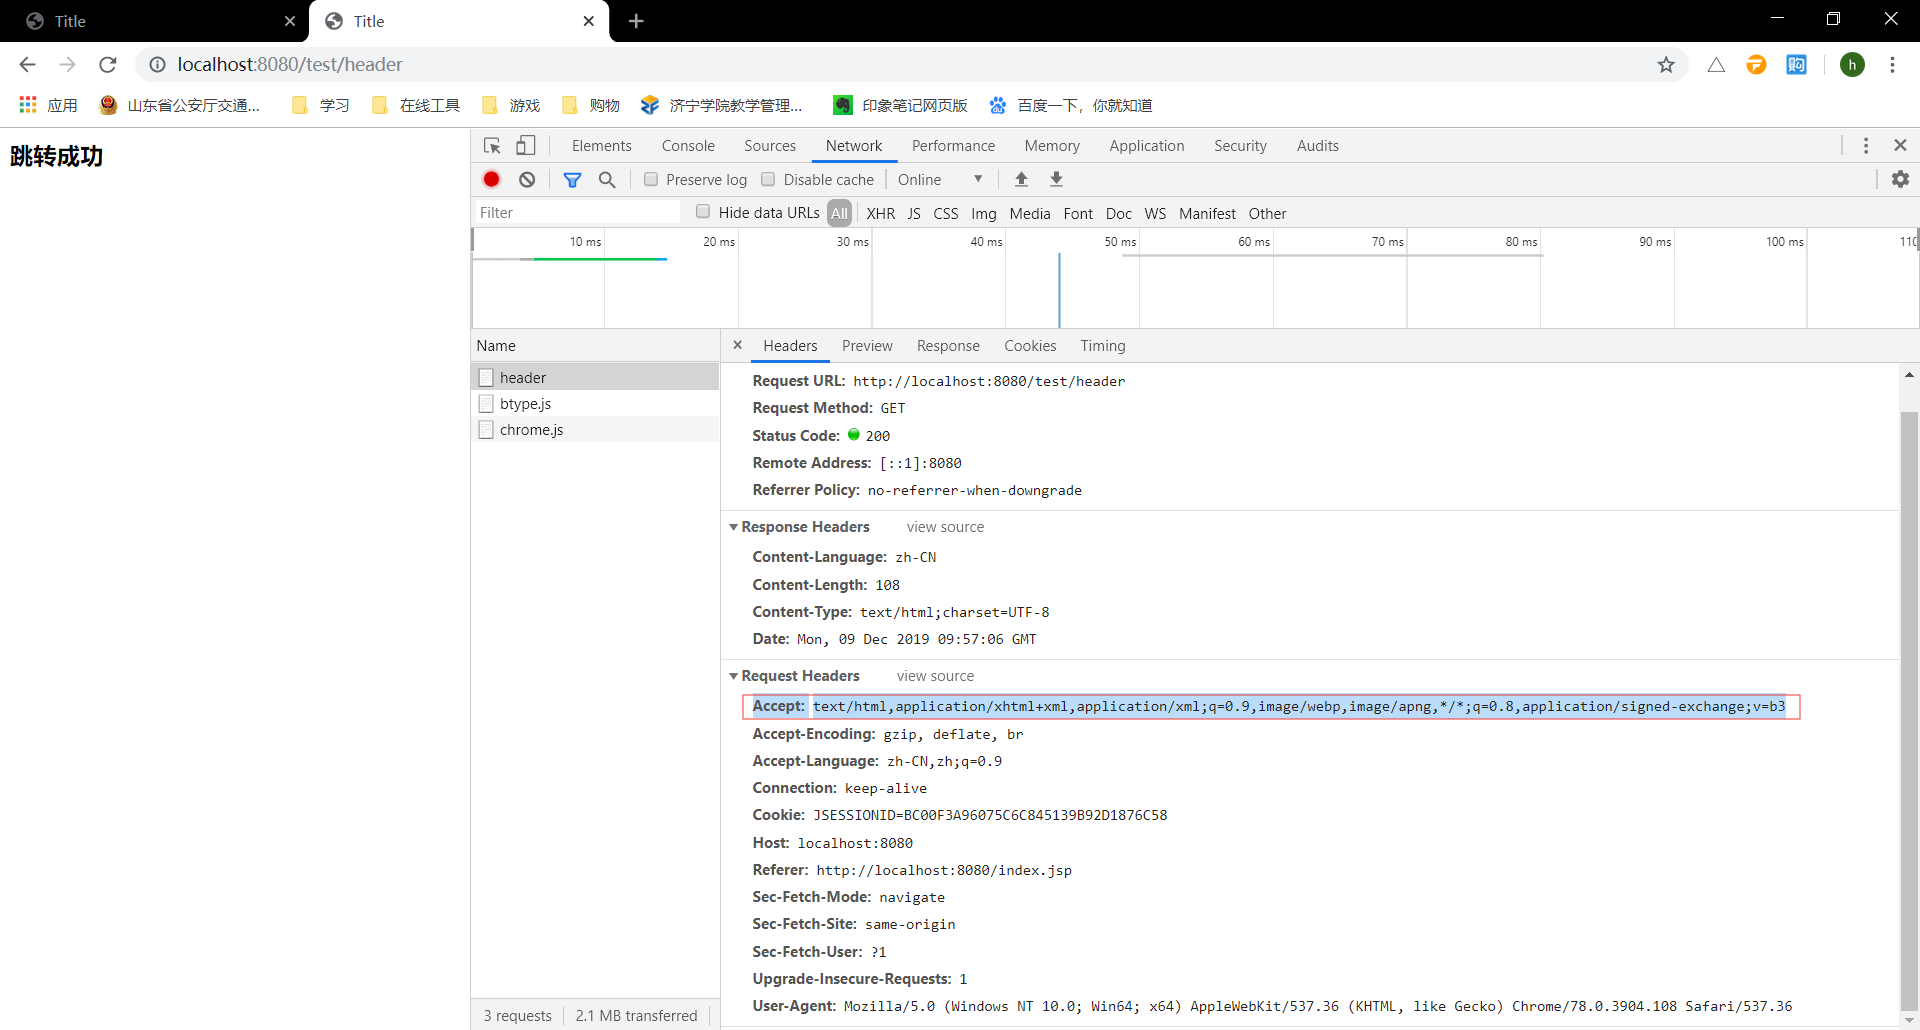
- 是否有所规定的请求头
<%@ page contentType="text/html;charset=UTF-8" language="java" %>
<html>
<head>
    <title>Title</title>
</head>
<body>
    <h3>SpringMVC入门程序</h3>

    <a href="test/hello">入门程序</a>

    <a href="test/header">检查是否有请求头</a>
</body>
</html>
package com.bean.controller;


import org.springframework.stereotype.Controller;
import org.springframework.web.bind.annotation.RequestMapping;
import org.springframework.web.bind.annotation.RequestMethod;

@Controller
@RequestMapping(path = "/test")
public class HelloController {
//    没有Application,凉了
    @RequestMapping(path = "/hello",headers = "Application")
    String sayHello(){
        return "/success";
    }

    @RequestMapping(path = "/header",headers = "Accept")
    String requestHeaders(){
        return "/success";
    }
}
转载请注明来源,欢迎对文章中的引用来源进行考证,欢迎指出任何有错误或不够清晰的表达。
