了解Swagger
- 号称是世界上最流行的API框架
- Restful API文档在线自动生成工具==>API文档与API同步更新
- 直接运行,可以在线直接测试API接口
- 支持多种语言:JAVA,PHP等
导入环境
- swagger2
- ui
<!-- https://mvnrepository.com/artifact/io.springfox/springfox-swagger2 -->
<dependency>
    <groupId>io.springfox</groupId>
    <artifactId>springfox-swagger2</artifactId>
    <version>2.9.2</version>
</dependency>
<!-- https://mvnrepository.com/artifact/io.springfox/springfox-swagger-ui -->
<dependency>
    <groupId>io.springfox</groupId>
    <artifactId>springfox-swagger-ui</artifactId>
    <version>2.9.2</version>
</dependency>
SpringBoot继承Swagger
- 新建一个Spring Boot - web项目
- 引入环境
- 配置Swagger
我们都知道,配置在Spring Boot中就是Config
有一件事:Swagger2是新版的,而Swagger是老版的
@Configuration
@EnableSwagger2 //允许Swagger使用,Swagger2是新版
public class SwaggerConfig {
}
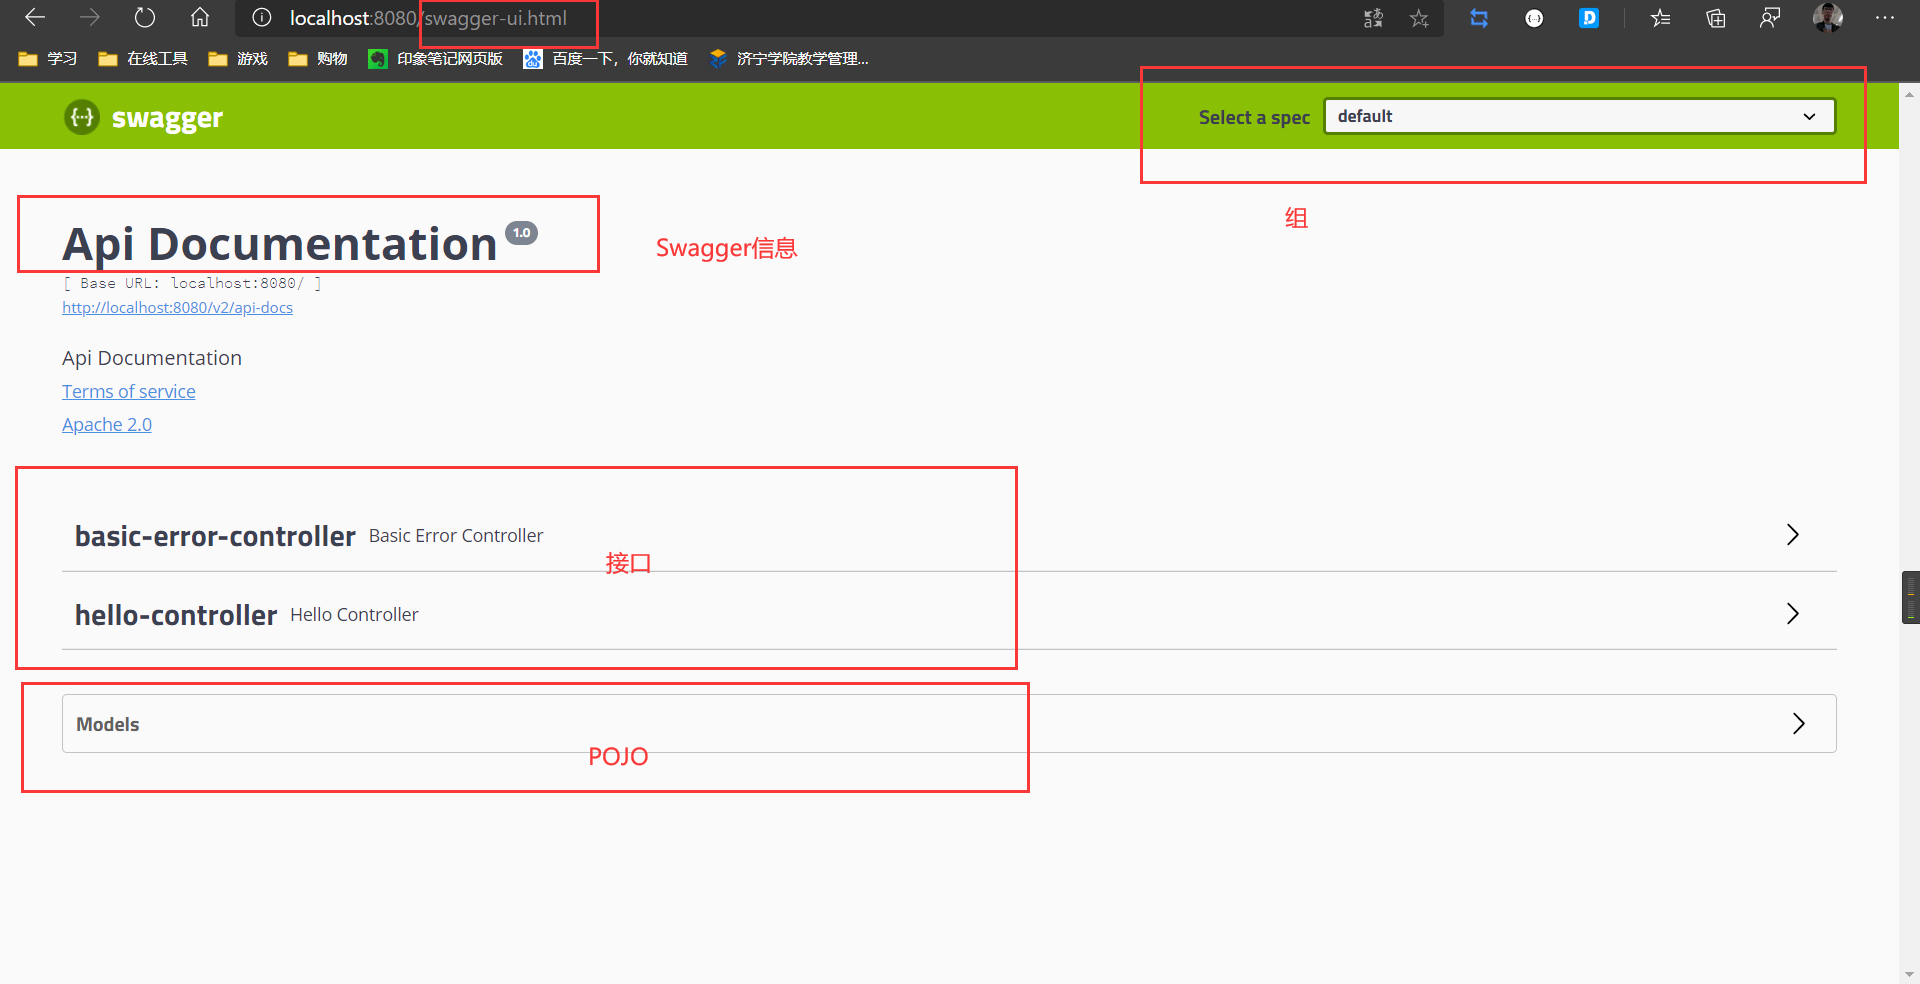
Swagger默认的页面是
swagger-ui.html,不用配置就有
配置Swagger
配置Swagger信息
- Contact:作者信息
name:作者url:作者地址email:作者邮箱
- API Info
title:标题description:描述version:版本termsOfServiceURL:组织的地址concat:作者描述
@Configuration
@EnableSwagger2 //允许Swagger使用,Swagger2是新版
public class SwaggerConfig {
/**
* 配置Swagger的Docket实例
* apiInfo:Swagger信息
* @return
*/
@Bean
public Docket docket(){
return new Docket(DocumentationType.SWAGGER_2)
.apiInfo(apiInfo());
}
/**
* Contact
* name:作者名
* url:作者地址
* email:作者邮箱
* ApiInfo
* title:标题
* description:描述
* version:版本
* termsOfServiceUrl:组织的地址
* concat:作者描述
* @return
*/
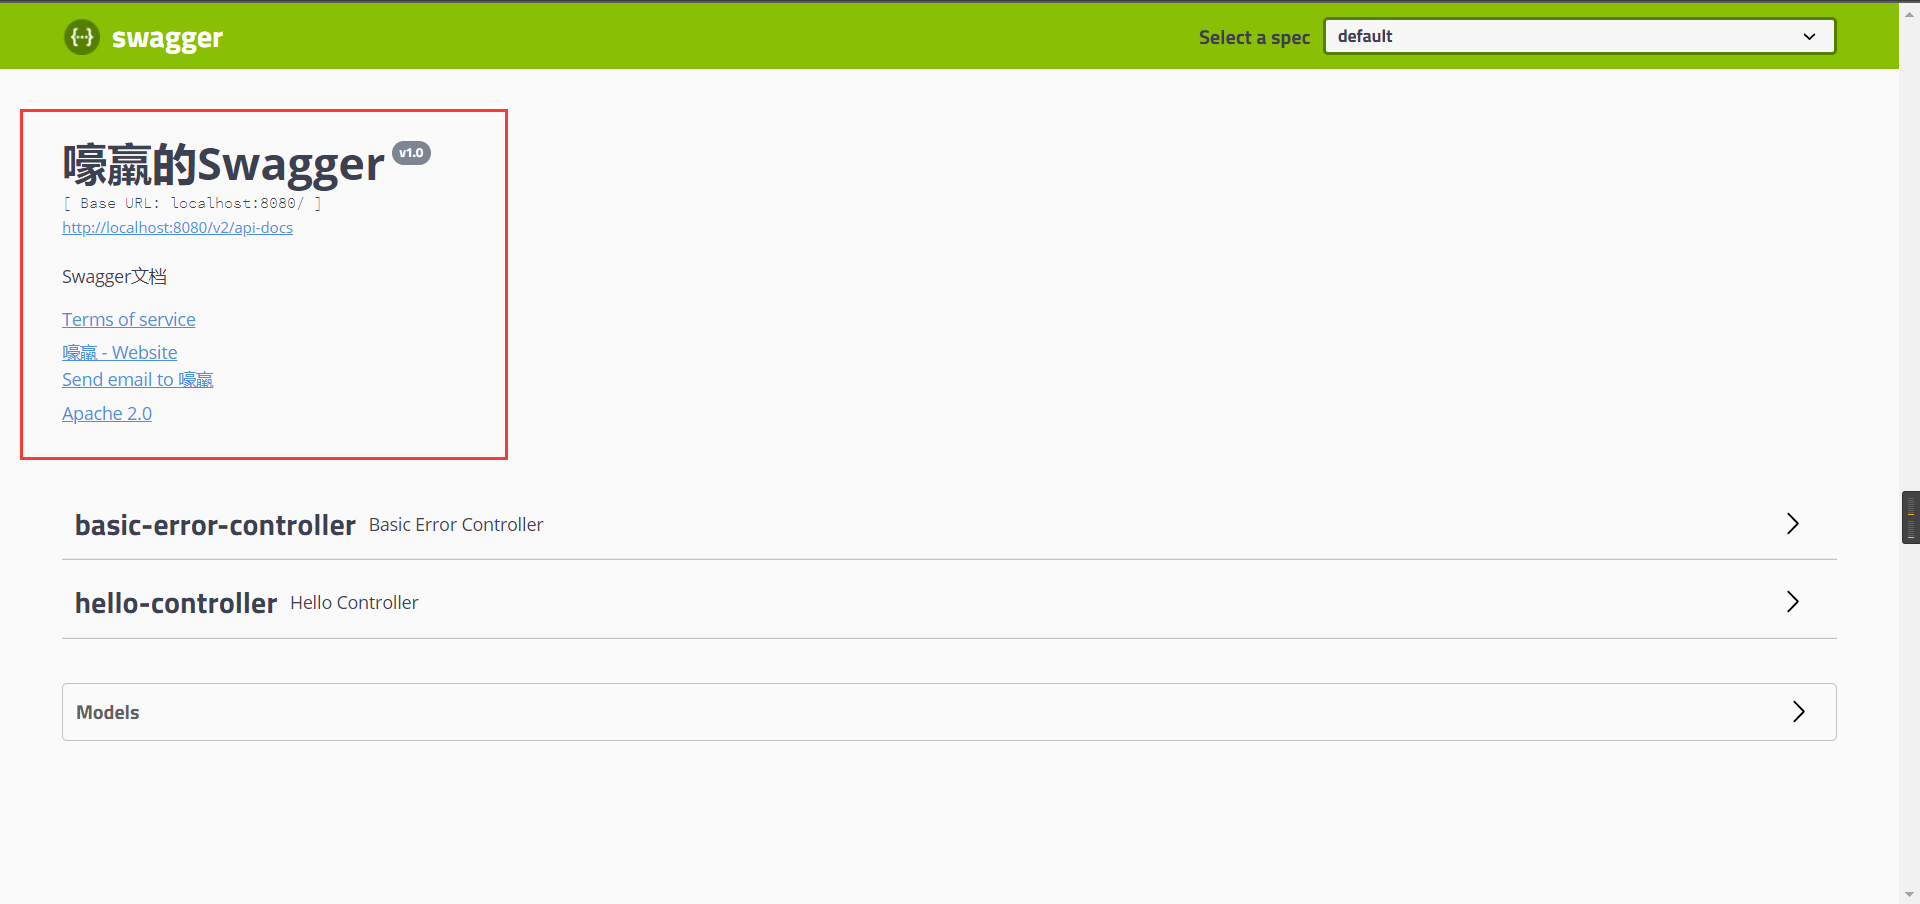
private ApiInfo apiInfo(){
Contact contact = new Contact("嚎羸","localhost:8080","xxxx@qq.com");
return new ApiInfo(
"嚎羸的Swagger",
"Swagger文档",
"v1.0",
"localhost:8080",
contact,
"Apache 2.0",
"http://www.apache.org/licenses/LICENSE-2.0",
new ArrayList<>()
);
}
}
配置Swagger的扫描接口
apis:设置要扫描的apiRequesthandlerSelectors:配置api的扫描方式basePackage:指定要扫描的包any:全部扫描none:全不扫描withClassAnnotation:扫描类上的注解,参数是一个注解的反射对象withMethodAnnotation:扫描方法上的注解,参数同上
paths:指定请求的路径PathSelectors:路径设置any:全都要ant:配置路径none:全不要regex:正则方式
@Configuration
@EnableSwagger2 //允许Swagger使用,Swagger2是新版
public class SwaggerConfig {

    /**
     * .apis(RequestHandlerSelectors.basePackage("com.bean")):只扫描com.bean.controller下的
     * .paths(PathSelectors.ant("/hello/**")):只扫描请求为xxx/hello/xxx的
     * @return
     */
    @Bean
    public Docket docket(){
        return new Docket(DocumentationType.SWAGGER_2)
                .apiInfo(apiInfo())
                .select()
                .apis(RequestHandlerSelectors.basePackage("com.bean.controller"))
                .paths(PathSelectors.ant("/hello/**"))
                .build();
    }

    private ApiInfo apiInfo(){
        Contact contact = new Contact("嚎羸","localhost:8080","xxxx@qq.com");
        return new ApiInfo(
                "嚎羸的Swagger",
                "Swagger文档",
                "v1.0",
                "localhost:8080",
                contact,
                "Apache 2.0",
                "http://www.apache.org/licenses/LICENSE-2.0",
                new ArrayList<>()
        );
    }

}
这场使用了构造器
- select
- builder
那么注意了,从select–>build中是一套,只有
apis和paths两个方法,要使用其他方法,到外边去
配置是否启动Swagger
- enable
- true:可以在浏览器中访问
- false:不可以在浏览器中访问
@Configuration
@EnableSwagger2 //允许Swagger使用,Swagger2是新版
public class SwaggerConfig {

    @Bean
    public Docket docket(){
        return new Docket(DocumentationType.SWAGGER_2)
                .apiInfo(apiInfo())
                .enable(false);
    }

    private ApiInfo apiInfo(){
        Contact contact = new Contact("嚎羸","localhost:8080","xxxx@qq.com");
        return new ApiInfo(
                "嚎羸的Swagger",
                "Swagger文档",
                "v1.0",
                "localhost:8080",
                contact,
                "Apache 2.0",
                "http://www.apache.org/licenses/LICENSE-2.0",
                new ArrayList<>()
        );
    }

}
问题来了:
我只想让我的Swagger的生产环境中使用,而不想在发布的时候用
解决方法:
- 要有多个配置文件
- 设定配置文件中哪个配置文件可以访问,哪些不可以访问Swagger
- 获取运行时使用的配置
- 判断是否为可以访问的配置文件
- 设置Swagger
- 配置多个配置文件
application.properties			#总控台
application-dev.properties		#生产环境
application-pro.properties		#发布环境
application-test.properties		#测试环境
这些配置文件什么也没有,就是个空壳,只不过创建出来了
- 我们假定使用生产环境和测试环境的时候可以访问
- 获取运行时的配置+判断是否可以访问+设置Swagger
SwaggerConfig.java
import org.springframework.core.env.Environment;
import org.springframework.core.env.Profiles;

@Configuration
@EnableSwagger2 //允许Swagger使用,Swagger2是新版
public class SwaggerConfig {

    @Bean
    public Docket docket(Environment environment){

        //通过profiles得到具体的环境配置
        Profiles profiles = Profiles.of("dev","test");

        //通过环境检测现在运行的环境是否是profiles中配置的环境
        boolean flag = environment.acceptsProfiles(profiles);

        //通过flag来设置swagger是否可见
        return new Docket(DocumentationType.SWAGGER_2)
                .enable(flag)
                .apiInfo(apiInfo());
    }

    private ApiInfo apiInfo(){
        Contact contact = new Contact("嚎羸","localhost:8080","xxxx@qq.com");
        return new ApiInfo(
                "嚎羸的Swagger",
                "Swagger文档",
                "v1.0",
                "localhost:8080",
                contact,
                "Apache 2.0",
                "http://www.apache.org/licenses/LICENSE-2.0",
                new ArrayList<>()
        );
    }

}
注意导入包别导错了
这只是一个方法,当然也可以使用Properties来进行检测
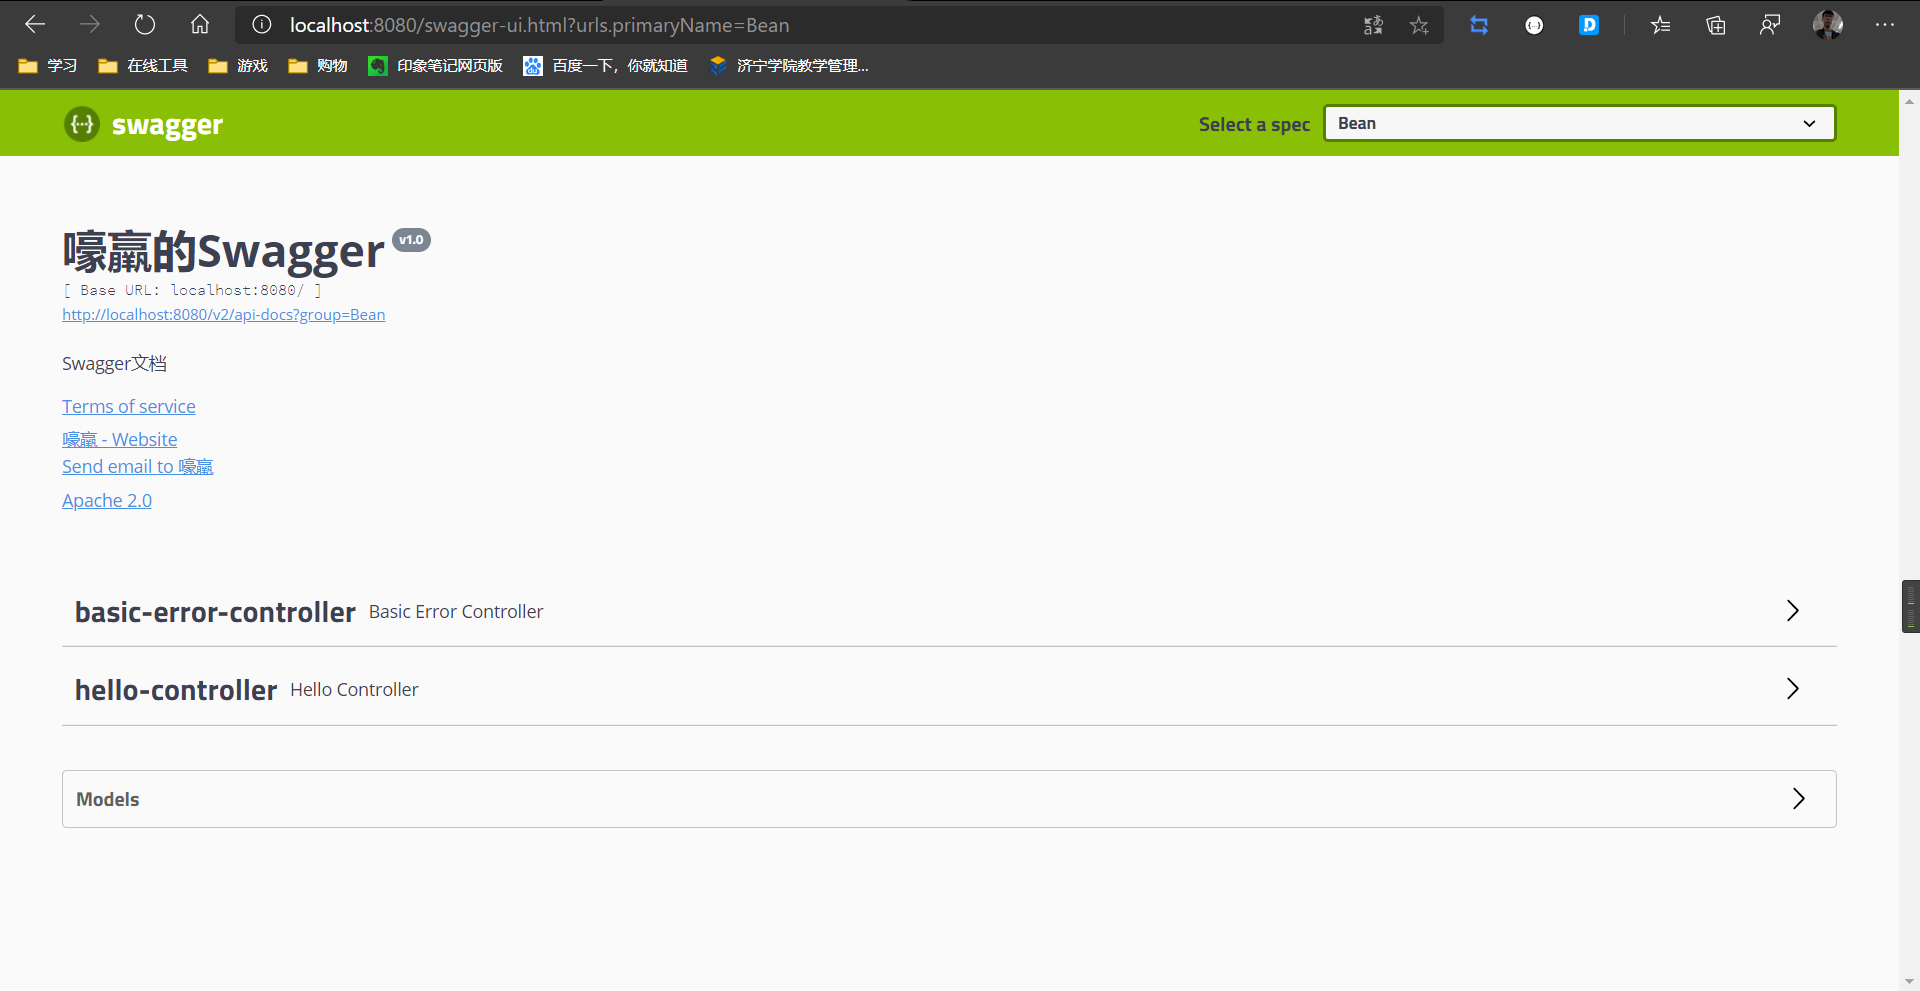
分组
@Configuration
@EnableSwagger2 //允许Swagger使用,Swagger2是新版
public class SwaggerConfig {

    @Bean
    public Docket docket(Environment environment){

        //groupName:分组名字
        return new Docket(DocumentationType.SWAGGER_2)
                .groupName("Bean")
                .apiInfo(apiInfo());
    }

    private ApiInfo apiInfo(){
        Contact contact = new Contact("嚎羸","localhost:8080","xxxx@qq.com");
        return new ApiInfo(
                "嚎羸的Swagger",
                "Swagger文档",
                "v1.0",
                "localhost:8080",
                contact,
                "Apache 2.0",
                "http://www.apache.org/licenses/LICENSE-2.0",
                new ArrayList<>()
        );
    }

}
使用.groupName进行分组
那么问题来了:
如何进行多组分组?
配置多个分组就需要多个.groupName(),而多个groupName就需要多个Docket
@Configuration
@EnableSwagger2 //允许Swagger使用,Swagger2是新版
public class SwaggerConfig {


    @Bean
    public Docket docket1(){
        return new Docket(DocumentationType.SWAGGER_2).groupName("A");
    }

    @Bean
    public Docket docket2(){
        return new Docket(DocumentationType.SWAGGER_2).groupName("B");
    }

    @Bean
    public Docket docket3(){
        return new Docket(DocumentationType.SWAGGER_2).groupName("C");
    }

    @Bean
    public Docket docket(Environment environment){

        //groupName:分组名字
        return new Docket(DocumentationType.SWAGGER_2)
                .groupName("Bean")
                .apiInfo(apiInfo());
    }

    private ApiInfo apiInfo(){
        Contact contact = new Contact("嚎羸","localhost:8080","xxxx@qq.com");
        return new ApiInfo(
                "嚎羸的Swagger",
                "Swagger文档",
                "v1.0",
                "localhost:8080",
                contact,
                "Apache 2.0",
                "http://www.apache.org/licenses/LICENSE-2.0",
                new ArrayList<>()
        );
    }

}
- 不要忘记交给Spring托管
- 分组的名字不能重复,否则会报错

注解和测试
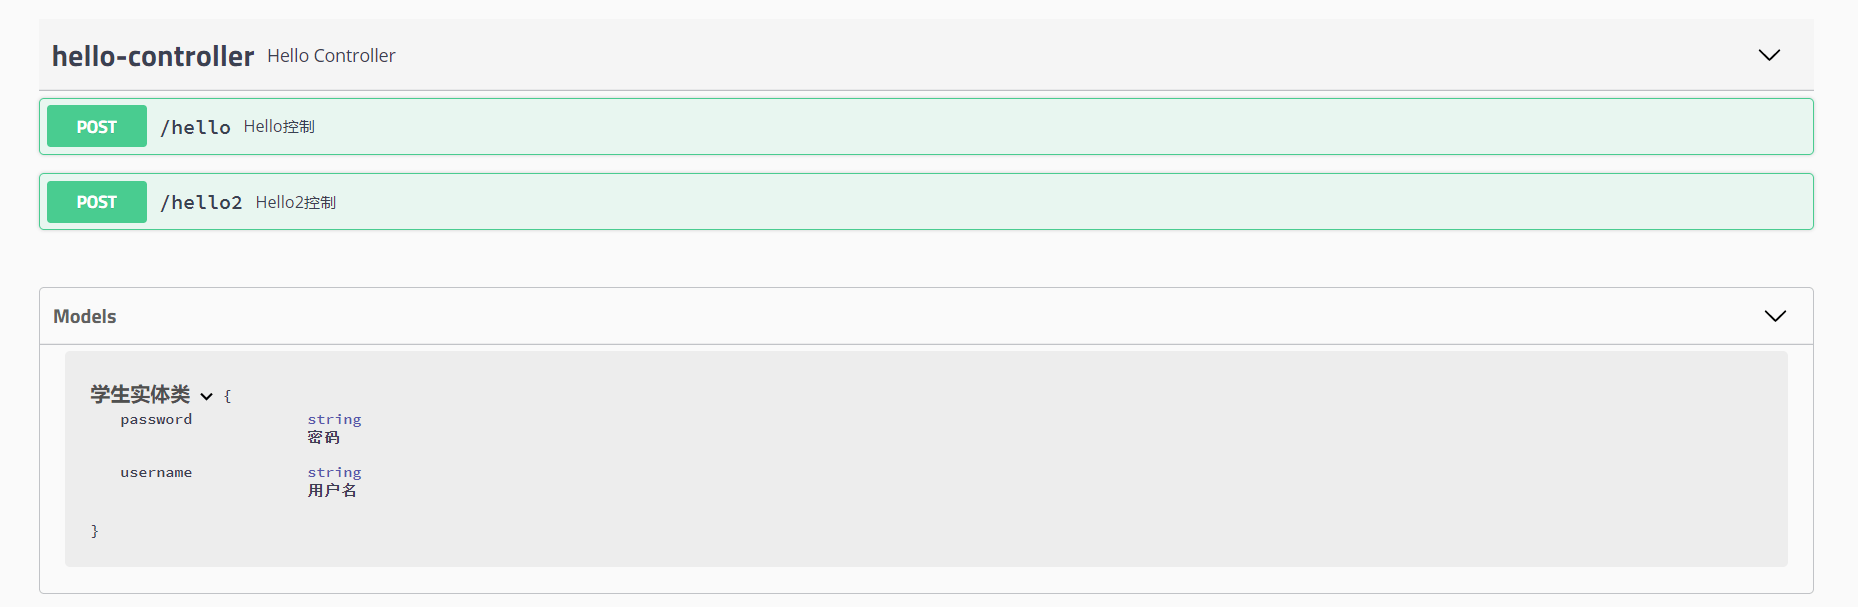
@ApiModle("xxx"):实体类@ApiModelProperty("xxx"):实体类参数@ApiOperation("xxx"):控制层方法@ApiParam("xxx"):控制层方法参数- 实体类
@ApiModel("学生实体类")
public class Student {

    @ApiModelProperty("id")
    private int id;

    @ApiModelProperty("用户名")
    public String username;

    @ApiModelProperty("密码")
    public String password;

}
- 注意,这里使用private的时候swagger是扫描不到的
- 只有控制层返回了这个实体类之后,swagger才会显示这个实体类
controller
@Controller
public class HelloController {
@PostMapping("/hello")
@ResponseBody
@ApiOperation("Hello控制")
public String hello(){
return "hello";
}
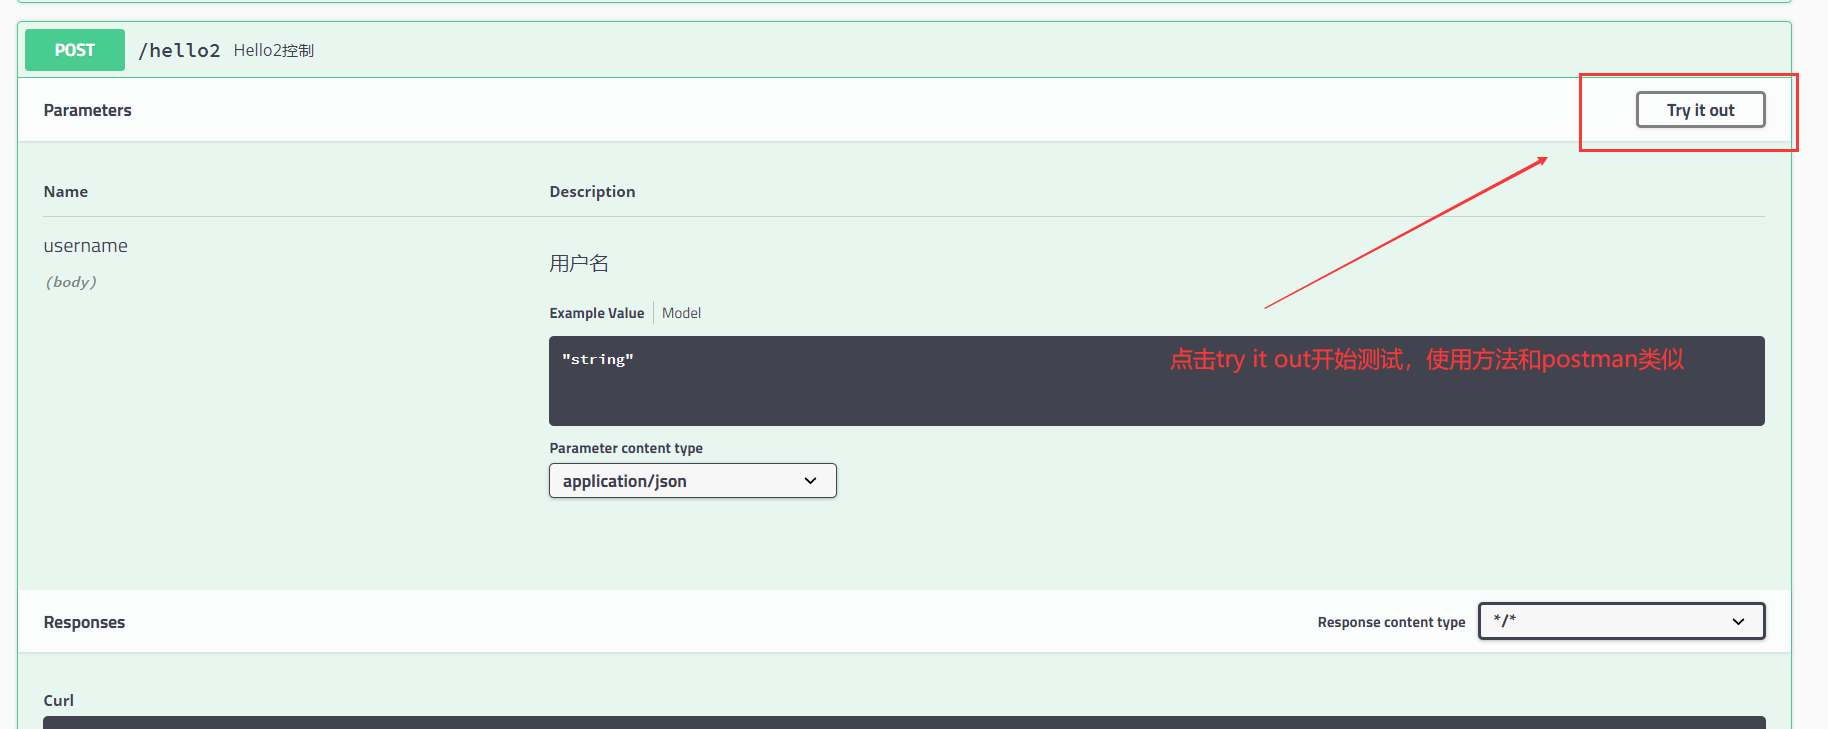
@PostMapping("/hello2")
@ResponseBody
@ApiOperation("Hello2控制")
public Student hello2(@ApiParam("用户名") String username){
return new Student();
}
}
任务
- 异步任务
- 定时任务
- 邮件发送
异步任务
在后端使用异步任务的时候前台不得不停止,这是一个很恐怖的事情
但是现在我们只需要两个注解就可以告诉spring这是一个异步任务,那么我们就可以实现前端秒刷新,后端慢慢加载
@EnableAsync:用于主方法上的类,开启异步任务@Async:作用于具体的异步方法,用于告诉Spring这是一个异步方法MainActivity
//开启异步注解功能:@EnableAsync
@EnableAsync
@SpringBootApplication
public class DemoApplication {

    public static void main(String[] args) {
        SpringApplication.run(DemoApplication.class, args);
    }
}
service
@Service
public class AsyncService {

    //告诉spring这是一个异步的方法:@Async
    @Async
    public void hello(){
        try {
            Thread.sleep(3000);
        } catch (InterruptedException e) {
            e.printStackTrace();
        }
        System.out.println("数据正在加载...");
    }

}
controller
@Controller
public class AsyncController {

    @Autowired
    AsyncService asyncService;

    @RequestMapping("/hello")
    @ResponseBody
    public String hello(){
        asyncService.hello();
        return "hello";
    }

}
邮件任务
- 环境
<!--邮件发送-->
<dependency>
    <groupId>org.springframework.boot</groupId>
    <artifactId>spring-boot-starter-mail</artifactId>
</dependency>
properties
# 账户
spring.mail.username=2592716753@qq.com
# 从邮箱中来的授权码
spring.mail.password=ivlqayhvydkaecec
# 主机,以smtp开头,如果是163就是smtp.163.com
spring.mail.host=smtp.qq.com

# qq特有的加密规则,是否开启安全验证
spring.mail.properties.mail.smtp.ssl.enable=true
- 测试代码
@SpringBootTest
class DemoApplicationTests {

    @Autowired
    JavaMailSenderImpl mailSender;

    @Test
    void contextLoads() {

        SimpleMailMessage message = new SimpleMailMessage();

        //收件人标题
        message.setSubject("收件人");
        //文本
        message.setText("文本");
        //收件人
        message.setTo("2592716753@qq.com");
        //发件人
        message.setFrom("2592716753@qq.com");


        mailSender.send(message);
    }

}
复杂些的邮件
@SpringBootTest
class DemoApplicationTests {

    @Autowired
    JavaMailSenderImpl mailSender;

	@Test
    void contextLoads2() throws MessagingException {


        MimeMessage message = mailSender.createMimeMessage();

        //这个有四个重载:MimeMessage(复杂邮件),multipart(支持多文件),encoding(支持编码)
        MimeMessageHelper helper = new MimeMessageHelper(message, true);

        //标题
        helper.setSubject("复杂类型邮件");

        //正文,这个也有重载:text(文本),html(html支持)
        helper.setText("<p style='color:red'>正文</p>",true);

        //添加附件
        helper.addAttachment("1.txt",new File("C:\\Users\\Bean\\Desktop\\1.txt"));

        //发件人
        message.setFrom("2592716753@qq.com");

        //收件人
        helper.setTo("2592716753@qq.com");


        mailSender.send(message);
    }
}
定时任务和CRON表达式
两个核心接口
TaskExecutor:任务执行者TaskScheduler:任务调度者
两个注解
@EnableScheduling:开启定时功能的注解@Scheduled:表示什么时候执行
CRON表达式
cron,在特定的时间执行特定的事情
CRON有六个参数,从左往右分别为:秒、分、时、日、月、周几(0~7)、年
| 域名 | 可取值 | 可取符号(仅列部分常用) |
|---|---|---|
| 秒域 | 0~59的整数 | * - , / |
| 分域 | 0~59的整数 | * - , / |
| 时域 | 0~23的整数 | * - , / |
| 日域 | 1~31的整数 | * - , / ? L |
| 月域 | 112的整数或JANDEC | * - , / |
| 周域 | 17的整数或SUNSAT | * - , / ? L # |
| 年域 | 1970~2099的整数 | * - , / |
*匹配全部-匹配范围:1-2表示1到2,表示枚举:1,2表示1和2/表示起始时间和间隔时间:*/5 * * * * ?:表示每隔5秒执行一次?只可以用在周或者日上,必须出现且只出现一次,表示不确定值L表示最后,只能用于日或者周:0 0 0 ? * 6L:每个星期六的0秒0分0时执行一次#只可以用于周,表示周几:#3:周3
- 年可以省略,省略时表示每年
- 注意,在CRON中,0和7都代表着周日,这个对中国人很友好
- 只有日和周有扩展符号
?在表达式中必须且仅出现一次,并且只能用于周或者日上,因为这两个相互冲突- 只有周有
#
例子:
秒		分 		时 		日 		月 		周		年

每隔5秒执行一次:*/5 * * * * ?

每隔1分钟执行一次:0 */1 * * * ?

每天23点执行一次:0 0 23 * * ?

每天凌晨1点执行一次:0 0 1 * * ?

每月1号凌晨1点执行一次:0 0 1 1 * ?

每月最后一天23点执行一次:0 0 23 L * ?

每周星期天凌晨1点实行一次:0 0 1 ? * L

在26分、29分、33分执行一次:0 26,29,33 * * * ?
每天的0点、13点、18点、21点都执行一次:0 0 0,13,18,21 * * ?
@EnableScheduling//开启任务调度
@SpringBootApplication
public class DemoApplication {

    public static void main(String[] args) {
        SpringApplication.run(DemoApplication.class, args);

    }
}
@Service
public class ScheduledService {

    @Scheduled(cron = "*/5 * * ? * 6")
    public void hello(){
        System.out.println("在特定的时间执行这个方法");
    }
}
转载请注明来源,欢迎对文章中的引用来源进行考证,欢迎指出任何有错误或不够清晰的表达。
